faq
Collapsible content
Why press-on nails?
When you pick out jewelry, you want it to match your outfit, suit your mood, and be perfect for the occasion - your nails should, and can, do
the same!
● Flexibility: Press-on nails give you the freedom to switch up styles whenever you like.
● Convenience: Get the look in under 10 minutes, right from the comfort of your home.
● Save Money: A fraction of the cost of a salon visit, plus they’re reusable!
● Non-Damaging: Follow the proper removal instructions and keep your natural nails strong and healthy.
Yes, beauty queens, you really can have it all!
Why Calm Storm press-on nails?
Not all press-on nails are created equal.
● Quality: Try our handcrafted nails and experience the difference for yourself. Made from 100% premium acrylics and handcrafted
with innovative soft gel, we offer you the the perfect balance of feather-light comfort and durability that stands up to your daily grind.
● Style: We take pride in our impeccable nail design taste. From timeless classics to bold statement pieces, every design exudes pure
sophistication.
● Sustainability: We're committed to reducing waste and being kind to the environment. From our thoughtfully designed nail sizes to
our lovingly selected packaging, we strive to be eco-friendly while still offering you uncompromised luxury.
Collapsible content
Why only 10 nails, when other brands offer 24-30?
Those larger sets give you a better chance of finding a fit, but most of the extra nails end up unused and wasted.
At Calm Storm, we offer a 10-nail set because our press-on nails are handcrafted, not machine-made. Instead of trying to fit everyone with
one larger set, we custom design nails in small, medium, and large sizes to ensure a perfect fit. That means better quality nails, tailored to
you, and less waste!
What are the sizes and will they fit?
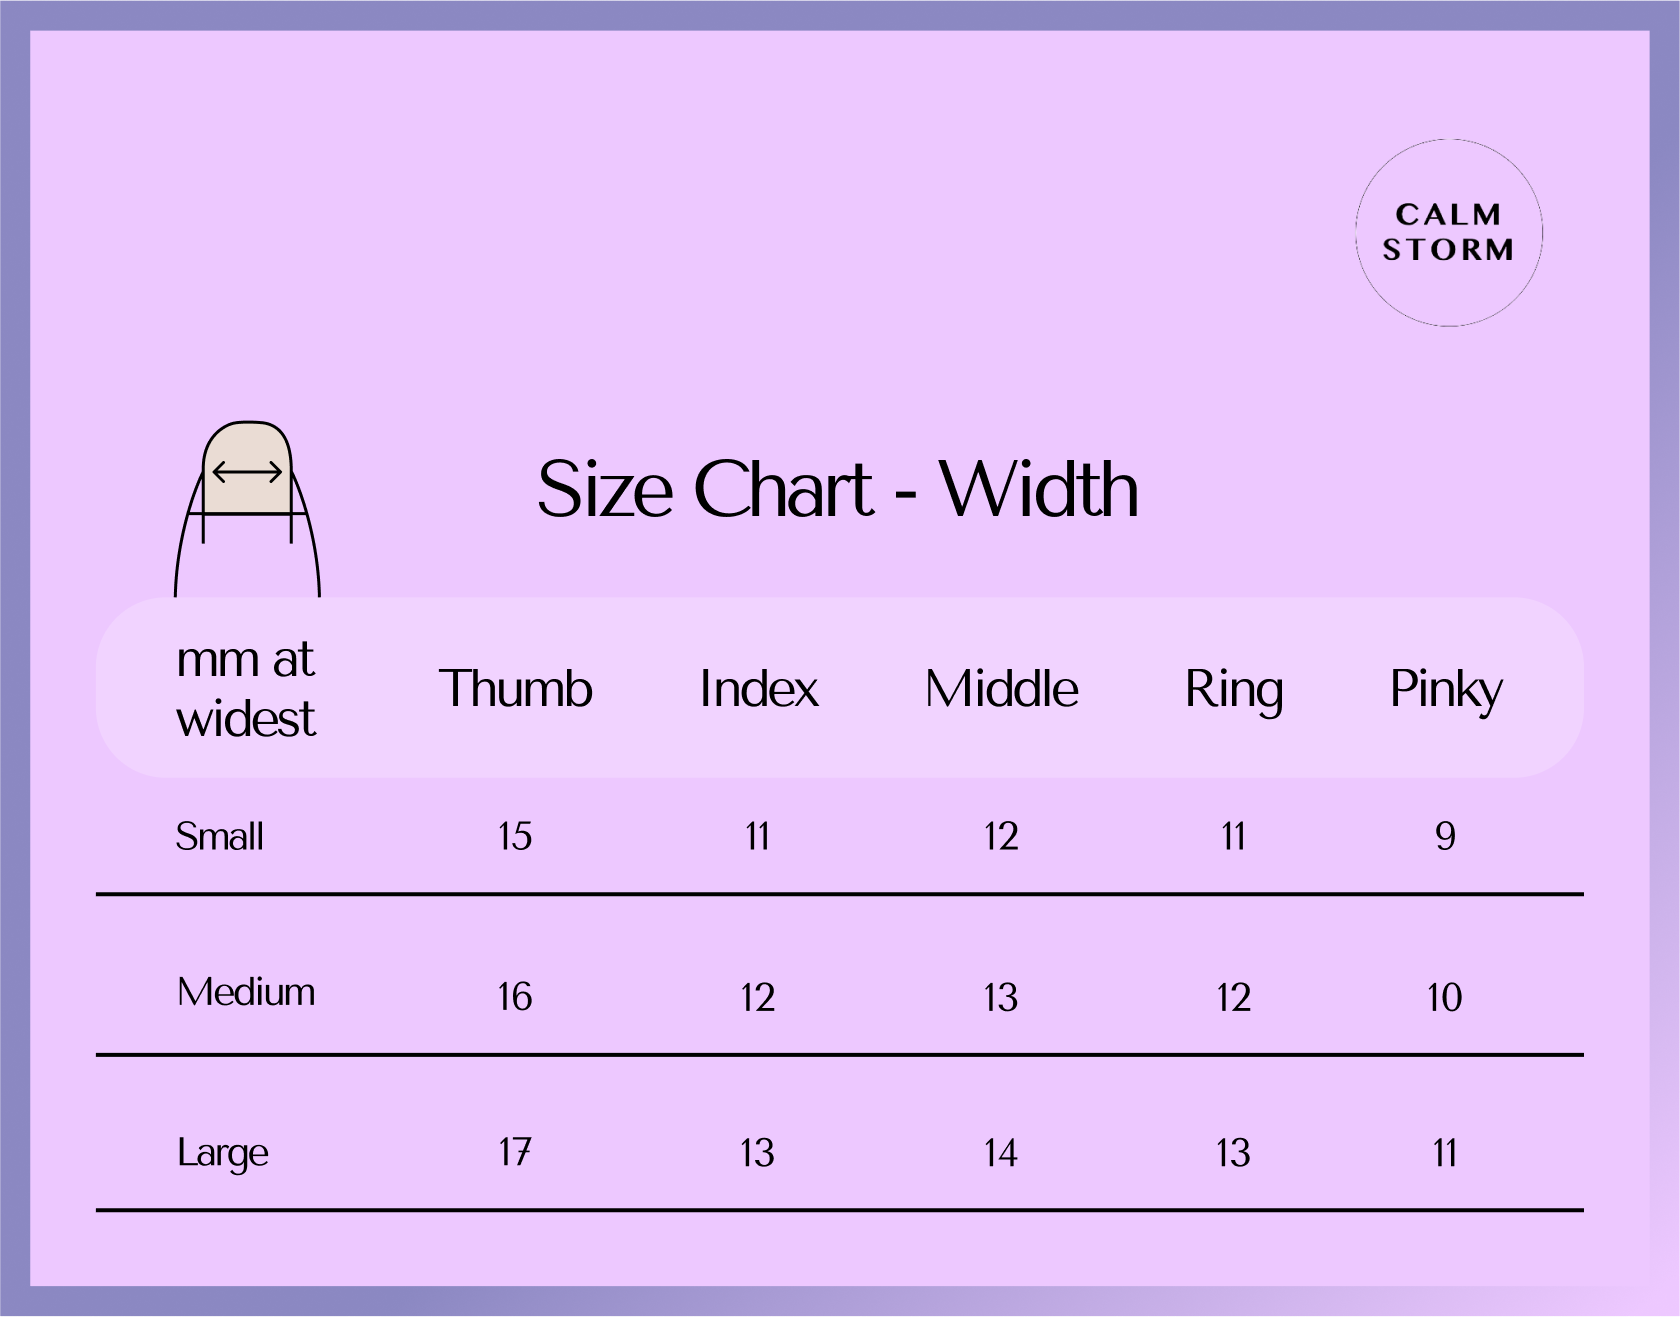
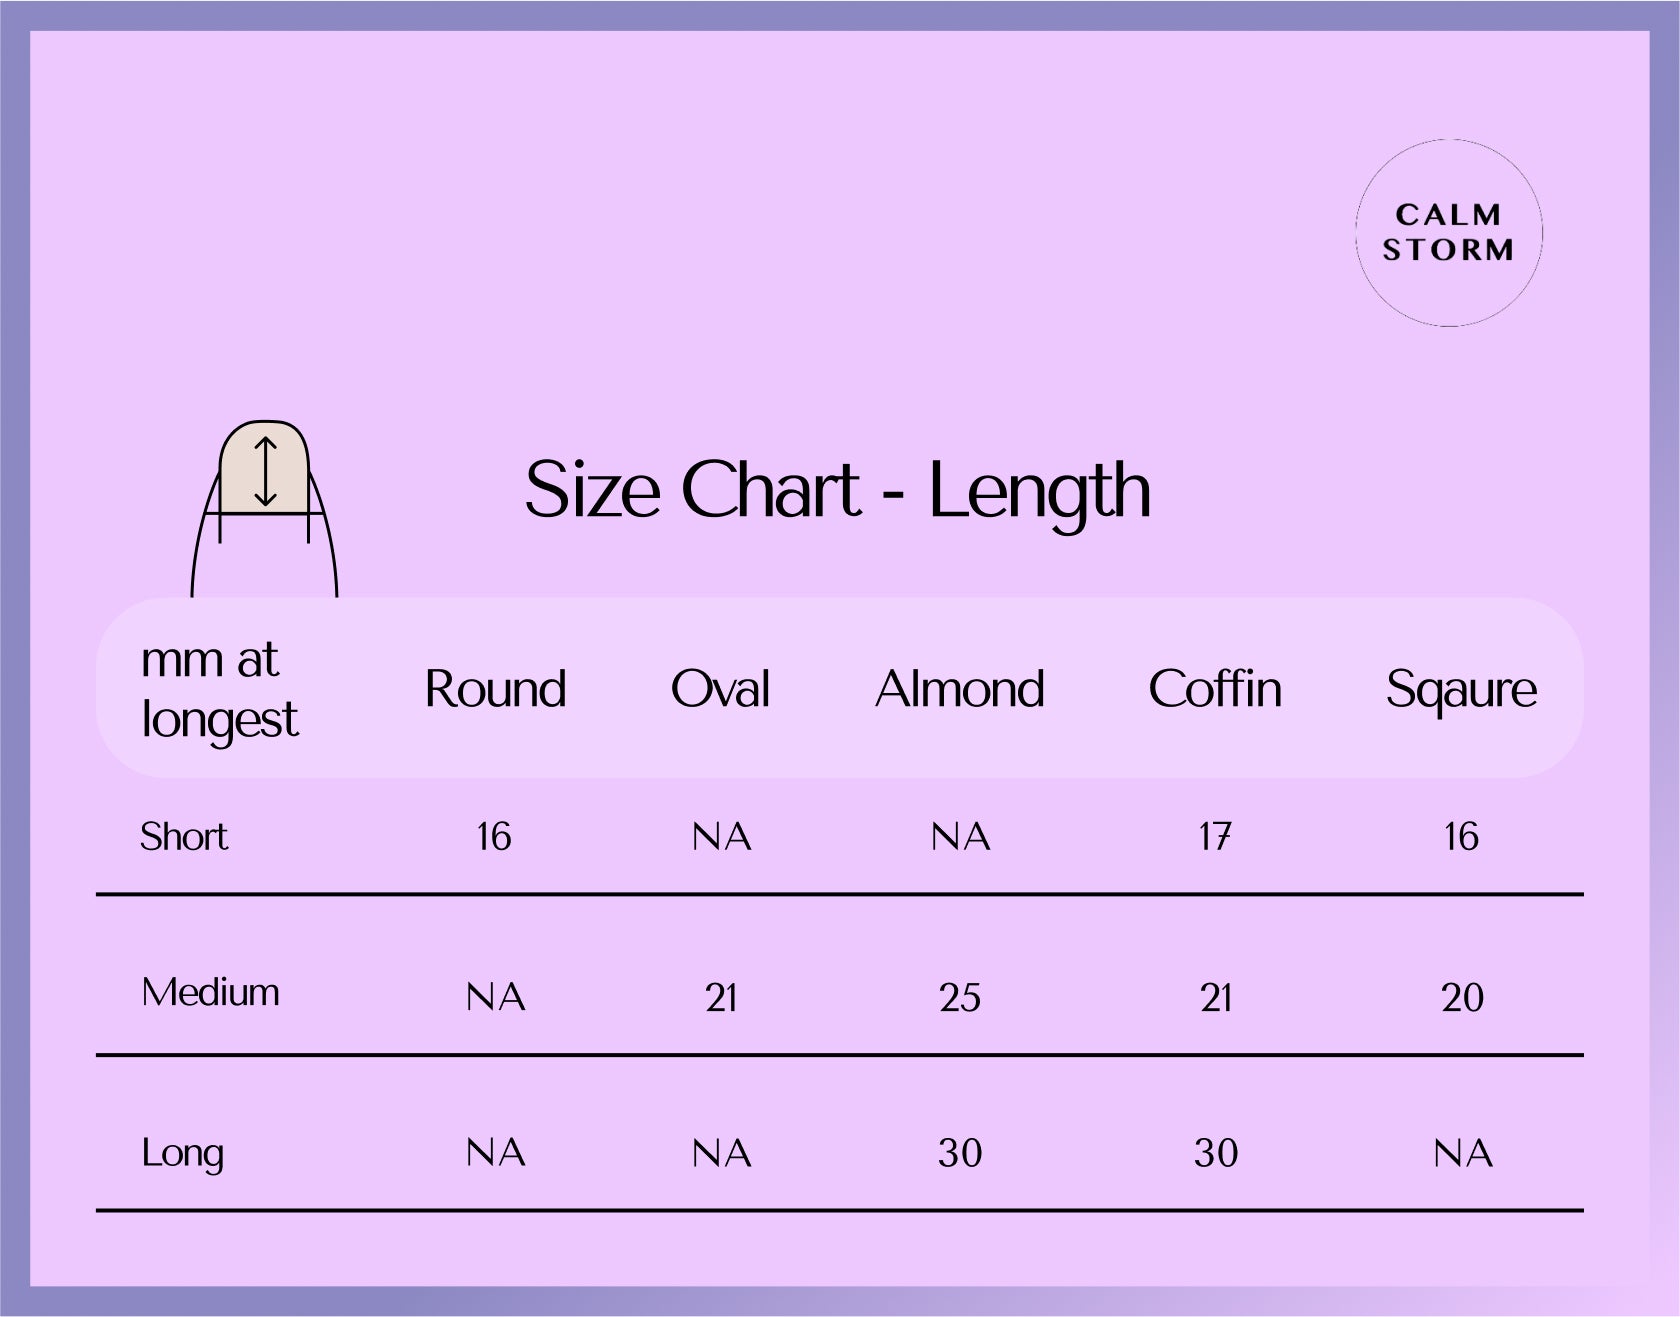
Our press-on nails come in small, medium, and large, designed to fit nearly all nail sizes and shapes.
But fellow beauty queens, let’s remember - our natural nails are wonderfully unique! The goal of press-on nails isn’t to duplicate each nail exactly, but to give you a polished, consistent look. A small 1-2 millimeter gap not only makes your nails and fingers appear more slender but also helps extend their wear time!
See below Calm Storm size chart and do get in touch with any special sizing requirement. We love a challenge and we love to help!


Which is better, sticky tabs or glue?
Aha! My favorite question! Have you got time? We could be here all day! The truth is, everyone is wonderfully unique with different lifestyles and needs. A clever beauty queen picks the right option to suit their vibe!
Sticky tabs: A good time! Application and removal are a breeze, and they stay solid for up to 7 days. Plus, they come off so clean, it’s almost therapeutic! Since you’re not wearing them for long stretches, your press-ons last longer for more occasions. Perfect for switching up styles, special events, long weekends, or styled nails are not suitable for your work. I’m definitely a good-time gal!
Glue: A long time! If you’re particular about a style and love to set it and forget it, glue is your miracle worker. Your nails stay on for up to 3 weeks, surviving everything - shampooing, typing, cooking, cleaning, and more. Our latest semi-solid glue formula makes application easier than ever, with no mess and easy repositioning. And guess what? Our special glue remover makes taking them off a breeze, leaving your natural nails damage-free!
How many times can you reuse the press-on nails?
The number of times you can reuse your press-ons largely depends on your lifestyle and how you remove them.
Lifestyle: Here’s a personal example. I love wearing nails from the Designer or Statement collection for special occasions or short trips using sticky tabs. For an average of 3 days of wear, I’ve easily reused them at least half a dozen times! Honestly, I haven’t thrown a set out
yet - even if they’re not as glossy as when I first wore them. With glue-on sets that last 2-3 weeks and survive all the daily chores, I’ve been able to reuse them up to 3 times before they lose their shine.
Removal: We all know that annoying feeling when something’s not sitting right and we just want to pick at it or even force it! But resist the urge! Proper removal is key to extending the life of your press-ons and keeping your natural nails healthy and free of damage.
Collapsible content
How do I know which size is right for me?
First, measure your nails! You can use a soft measuring tape to get the curved width of your nails, or if you don’t have one, grab anything flexible - like a piece of paper, thread, or clear tape. Wrap it around your nail, make marks at either end, then measure with a ruler and find your fit in our size chart.
Some people love a snug fit, while many prefer their press-ons 1-2 mm narrower for a more slender look. If you have any size-related questions or special requests, don’t hesitate to get in touch! We love a challenge and are always happy to help.


How to apply the nails using our seriously sticky tabs?
For something supposed to be temporary, these tabs are seriously sticky! And you have everything you need provided in the pack for you.
● Give your hands a good clean and pad dry. Gently push and cut cuticles to create clean edges.
● Gently file your nails with the nail butter. This is important as it will create better contact.
● Give your nails a good wipe with the alcohol pad. This is import as it removes any oil and create better bonding. Do not touch after wiping, and let them air dry.
● Select the right sized tabs from your sticker sheet, remove them holding the little tongue on top, then place them as close as possible to the bottom of your nail bed. Don’t worry if it is not perfectly positioned at first, a slight movement to adjust is totally fine.
● Using a bottom to top, centre to sides movement, smooth out any air and make sure the tab is evenly secured on your nail.
● Remove the protective film, place the press-on nail 1mm away from the bottom of your nail bed, push it down towards your nail bed, then firmly apply pressure, again using bottom to top, centre to sides movement.
Everyone has their own preferred method. Some like to apply a tab, remove the protective film, then apply a press-on nail, one finger at a time. I like to apply tabs for all five fingers first, leaving the protective films attached, and only remove them as I apply the nails to each finger. Some start from the thumb, some prefer the pinky. You will find your groove with a little practice!
The trick is to keep your nails dry for a couple of hours after. It is the secret to long lasting success!
How to apply the nails using glue?
● Give your hands a good clean and pad dry. Gently push and cut cuticles to create clean edges.
● Gently file your nails with the nail butter. This is important as it will create better contact.
● Give your nails a good wipe with the alcohol pad. This is import as it removes any oil and create better bonding. Do not touch after wiping, and let them air dry.
● Gently squeeze a little glue to the back of the press-on nail, ONLY where it will make contact with your natural nail
● Use the bottle spout to distribute the glue evenly and try to contain the glue in the centre and not too close to the edges, as the glue will distribute when applied to your nail.
● Vary the amount of glue based on how long you want it to last, and you don't really need to put glue on your natural nails.
● Give the glue 3-5 seconds to get tacky and place the press-on nail 1mm away from the bottom of your nail bed, push it down towards your nail bed, then firmly apply pressure, using bottom to top, centre to sides movement, for about 10 seconds.
● Don’t fret if the nail isn’t perfectly position at first, with our new advanced formula semi solid glue, repositioning is very simple.
If you are a beginner, less glue is better as this avoids extra glue flow down to the edge. With a little practice you will know just the right amount
of glue for your desired level of wearing.
The trick is to keep your nails dry for a couple of hours after. It is the secret to long lasting success!
How to remove the sticky tabs?
● Soak your nails in warm soapy water for 5-10 minutes.
● Use the sharp edge of the cuticle pusher and give the edges a gentle poke.
● The nails will start to separate now. Using either left-right or up-down movement horizontally to your natural nail. Do not force lift from the tip, this will risk damaging both the press-on and your natural nail.
● Once the press-on is off, give the back a good clean so they are ready for the next occasion.
● Gently rub your natural nails and the residual sticky tabs will roll off like a little ball.
How to remove glued on nails?
● Removing glued on nails is easier after at least 2 weeks of wear as your nail will have grown out and the glue start is debonding process.
● Use the sharp edge of the cuticle pusher and give the edges a gentle poke. Apply our glue remover around the edges will help make the process much faster and easier.
● Repeat the process one or two more times - gentle poke + glue remover, your press-on nails should come off easily now.
● Once the press-on is off, give the back a good clean so they are ready for the next occasion.
● Gently buff your natural nails to remove any residual glue.
